Monday, 30 January 2017

SQL Database Modes/States

A SQL database is always in one specific state. 

To verify the current state of a database, select the state_desc column in the sys.databases catalog view or the Status property in the DATABASEPROPERTYEX function.

The following table defines the database states.


State Definition
ONLINE                                                                                                                                         
Database is available for access. The primary filegroup is online, although the undo phase of recovery may not have been completed.
OFFLINE
Database is unavailable. A database becomes offline by explicit user action and remains offline until additional user action is taken. For example, the database may be taken offline in order to move a file to a new disk. The database is then brought back online after the move has been completed.
RESTORING
One or more files of the primary filegroup are being restored, or one or more secondary files are being restored offline. The database is unavailable.
RECOVERING
Database is being recovered. The recovering process is a transient state; the database will automatically become online if the recovery succeeds. If the recovery fails, the database will become suspect. The database is unavailable.
RECOVERY PENDING
SQL Server has encountered a resource-related error during recovery. The database is not damaged, but files may be missing or system resource limitations may be preventing it from starting. The database is unavailable. Additional action by the user is required to resolve the error and let the recovery process be completed.
SUSPECT
At least the primary filegroup is suspect and may be damaged. The database cannot be recovered during startup of SQL Server. The database is unavailable. Additional action by the user is required to resolve the problem.
EMERGENCY
User has changed the database and set the status to EMERGENCY. The database is in single-user mode and may be repaired or restored. The database is marked READ_ONLY, logging is disabled, and access is limited to members of the sysadmin fixed server role. EMERGENCY is primarily used for troubleshooting purposes. For example, a database marked as suspect can be set to the EMERGENCY state. This could permit the system administrator read-only access to the database. Only members of the sysadmin fixed server role can set a database to the EMERGENCY state.


Monday, 22 August 2016

Cannot show requested dialog. (SqlMgmt) Property Owner is not available for Database


When I try to access database properties in SSMS, I faced below error.


This error looks like permission issue, but this is because of database owner was NULL. Not sure how owner changed to NULL.

Run below query to find owner of specific database

SELECT name,
       suser_sname(owner_sid) AS owner
FROM   sys.databases where name = 'DBName'
Change owner of database from NULL to SA
USE DBName
EXEC sp_changedbowner 'sa'


Now you can access properties of database in SSMS


Friday, 15 July 2016

Slipstream Installation SQL Server 2012 and 2014


Slipstream is an installation method in SQL Server where SQL Server Instance and Service Pack/CU can be packaged together. This feature has been introduced from SQL 2008 SP1.

There are two types of slipstream methods.

1)      Simple Slipstream
2)      Advanced Slipstream

Simple Slipstream (2012):

This is command based installation which requires bit knowledge on installation parameters.
These are the parameters we need to know before going with this installation.

      /Action
       Install
      /UpdateEnabled
       True or 1
       False or 0            
      /UpdateSource
       MU
       UNC path
       .\Myupdates


Step 1: Here, I placed SQL 2012 media with SP in C:\ drive


Step 2: Now open Command Prompt with Admin privileges (Run as administrator).

Step 3: Run below parameters in command prompt.


C:\ SQL2012_Ent_X64_RTM>setup.exe /Action=Install /UpdateEnabled=True /UpdateSource=”c:\SQL2012_SP”

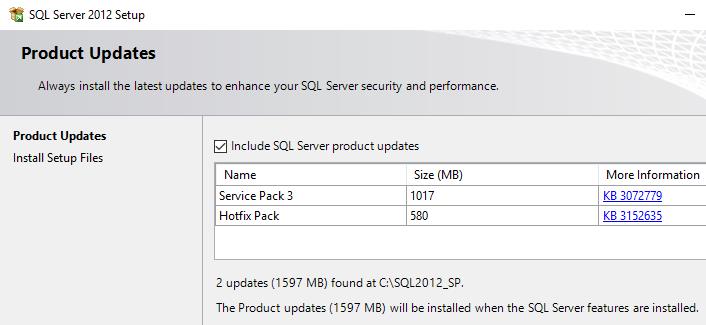
This command starts the SQL install and patches the SP & CU from path mention under UpdateSource parameter.


You can find the SP and CU details in Product Updates screen of install wizard.

Note: If you place the entire SP’s and CU’s in same folder, this command takes the latest one to install.

Advanced Slipstream (2014)

This is easy method where you merge SP & CU within the SQL media. Here we won’t use any command prompt parameters. This is completely GUI.

Step 1: Here, I placed SQL 2014 media wit in C:\ drive


Step 2: Create new folder PCUSource inside media and place SP & CU in that folder.


Step 3: Now navigate to x64 folder and open Default.ini file in notepad.


Step 4: Add parameter UpdateSource=”./PCUSource” in Default.ini file and save it.


Step 5: Start your installation from steup.exe file.

You can find the SP and CU that are patched with installation under Product Updates wizard screen.

You can also perform advanced Slipstream in SQL 2012 and Simple Slipstream in SQL 2014 (Viceversa).

Thursday, 9 June 2016

Transparent Data Encryption Implementation And Moving TDE Database to another instance

Configuring TDE should go through 4 steps.

Create Master Key -> Create Certificate protected from Master Key -> Create database Encryption Key & protect by Certificate -> Enable Encryption on database.

Step 1: Create Master Key
This is mandatory step. Without this Master Key you won’t be able to create Certificate.

USE Master
GO
CREATE MASTER KEY ENCRYPTION BY PASSWORD = 'TDEkey123'
GO

Step 2: Create Certificate protected from Master Key.

USE Master
GO
CREATE CERTIFICATE TDE_Demo WITH SUBJECT = 'TDE Certificate'
GO

If you are already having a Certificate, you can check using sys.certificates view.

Step 3: Create database Encryption Key & protect by Certificate
Here we are going to use AES algorithm for encrypting database.

USE TDE_DEMO
GO
CREATE DATABASE ENCRYPTION KEY
WITH ALGORITHM = AES_128
ENCRYPTION BY SERVER CERTIFICATE TDE_Demo
GO

Once you execute the above T-SQL, it will ask to back up the encryption key

Warning: The certificate used for encrypting the database encryption key has not been backed up. You should immediately back up the certificate and the private key associated with the certificate. If the certificate ever becomes unavailable or if you must restore or attach the database on another server, you must have backups of both the certificate and the private key or you will not be able to open the database.


Step 4: Enable Encryption on database

ALTER DATABASE TDE_DEMO
SET ENCRYPTION ON
GO

Query to check whether database is encrypted or not.

SELECT name,is_encrypted FROM sys.databases WHERE name='TDE_DEMO'


Backup the certificate as discussed in Step 3.

USE Master
GO
BACKUP CERTIFICATE TDE_Demo TO FILE = 'C:\SQL_2K14\S\TDE_Encryption\TDE_DEMO_Certificate_backup'
WITH PRIVATE KEY (FILE = 'C:\SQL_2K14\S\TDE_Encryption\TDE_DEMO_key' ,
ENCRYPTION BY PASSWORD = 'TDEdemo123')
GO


Note: Please make sure to take backup of the certificate, because without that certificate you can’t do anything with the physical files of the database.

Moving TDE enabled database.

In order to move TDE enabled database you need to create certificate in destination instance from the backup of certificate we create while implementing in source instance.

Copy the Certificate and Private key file to destination server.

USE Master;
CREATE MASTER KEY ENCRYPTION BY PASSWORD = 'TDEdemo123'
GO

CREATE CERTIFICATE TDE_Demo
    FROM FILE = 'C:\SQL_2K14\S\TDE_Encryption\TDE_DEMO_Certificate_backup'
    WITH PRIVATE KEY (FILE = 'C:\SQL_2K14\S\TDE_Encryption\TDE_DEMO_key',
    DECRYPTION BY PASSWORD = 'TDEdemo123');
GO


All the above paths and passwords are taken from source instance. You can find them in above TDE implementation article.
Now you can move TDE enabled database from source to destination.

You can use normal Backup and restore method or Attach and Detach method. Without creating Encryption key and certificate in destination you can move the TDE database.


Wednesday, 1 June 2016

Restore Database failed: Exclusive access could not be obtained because database is in use


This is quite common error message we see, when we restore database. This occurs if any other users connected to the database you tried to restore.


We have different of methods to resolve this based on our requirement.

1)      Alter Database to Single User Mode
Changing database to single user mode roll backs all connections at once.

ALTER DATABASE DATABASE_NAME SET SINGLE_USER WITH ROLLBACK IMMEDIATE
GO
RESTORE DATABASE DATABASE_NAME FROM DISK = 'C:\DATABASE_NAME.BAK'
GO

2)      Kill all active connections on database you need to restore.
Use SP_WHO2 to find connections active on that database. Use KILL command to kill all the connections and then restore the database.

KILL (SPID)

3)      Make database OFFLINE (this will kill all the connections on that database), make database back ONLINE. Now perform restore database task.

ALTER DATABASE DATABASE_NAME SET OFFLINE WITH ROLLBACK IMMEDIATE
GO

ALTER DATABASE DATABASE_NAME SET ONLINE
GO


Tuesday, 3 May 2016

Move SQL Database from one drive to another


This is a common task most of DBA’s perform regularly. You face this situation when your data file drive is full and windows team cannot add disk space or you cannot clear any space in drive.

Task:
We have data file located in C:\SQL_2K14\M\MSSQL_DATA\Audit.mdf


Above data file should be moved to G:\MSSQL_DATA

This task takes database offline; make sure you have all the appropriate approvals needed for this Change. (This task needs change ticket)

Step 1: Check the current location of database files.

USE master
GO
SELECT name AS LogicalFileName, physical_name AS FileLocation
, state_desc AS Status
FROM sys.master_files
WHERE database_id = DB_ID('Audit');


Step 2: Make database offline.

USE master
GO
ALTER DATABASE Audit SET OFFLINE WITH ROLLBACK IMMEDIATE
GO

*** All incomplete transactions will be rolled back and any other connections to the Audit database will be immediately disconnected. ***

Step 3: Move the database file from C drive to G drive physically.


Step 4: Modify the logical name and path of data file (new path).

USE master
GO
ALTER DATABASE [Audit]
MODIFY FILE
( NAME = [Audit], -- Logical name you can find in step 1
FILENAME = 'G:\MSSQL_DATA\Audit.mdf'); -- New file path

To Move log files: Apply Step 3 & 4 for moving log files too.


Step 5: Bring database online.

USE master
GO
ALTER DATABASE Audit SET ONLINE;


Step 6: Perform consistency checks (CheckDB).


Tuesday, 12 January 2016

Connecting to SQL Server 2014 Integration Services failed with Error : "Access is denied"


I have installed SQL 2014 Database Engine with minimum requirement features and able to connect to SSMS successfully. Later we got a request to install SQL Integration Services. Here comes the problem, after the install when I connect to Integration services facing below error.


Connecting to the Integration Services service on the computer "localhost" failed with the following error: "Access is denied."

By default, only administrators have access to the Integration Services service. On Windows Vista and later, the process must be running with administrative privileges in order to connect to the Integration Services service. See the help topic for information on how to configure access to the service.

Resolution:

This is a UAC (User Access Control) issues. You need to run SSMS as administrator.

Start -> All Programs -> Microsoft SQL Server 2014 -> right click on SQL Server Management Studio 2014 -> click on Run as Administrator.